
In Part 1, we got our basic application ready with the following setup:
- Application and Routing Configuration
- TodoMVC defined assets
- Initial UI – HTML markup and CSS stylesheet
In Part 2, we explore configuring all of the CRUD actions and update all associated artifacts – model, controller and binder. Specifically, we explore the following actions – one at a time:
- Action – List all TODOs
- Action – Add a TODO
- Action – Edit a TODO
- Action – Mark one or all complete
- Action – Delete a TODO
Step 1: Action – List all TODOs
The first thing that we build up is retrieving all TODO items and showing them up. If there are no items in the list, then, as per the specs, the #main element must be hidden.
Let us start with updating the model followed by the controller and binder in that order.
Updating the model
We add a function getAll. Though, in our case, the storage is simple and synchronous, I would rather prefer to write the method in the manner preferred in asynchronous systems. The method requires no inputs to process. As such, our function takes exactly one parameter – a callback function to be invoked to return the result – failure or success.
Below is the code for the function:
YUI.add('TodoMojitModelTodo', function(Y, NAME) {
  var storage = new Y.CacheOffline();

  Y.namespace('mojito.models').Todo = {
    init: function(config) {
      this.config = config;

      var initData = storage.retrieve('todo');
      if(!initData) {
        storage.add('todo', []);
      }
    },

    getAll: function(callback) {
      if(storage) {
        var obj = storage.retrieve('todo'),
            rv = obj.response;
        callback(null, rv);
      } else {
        callback('Storage not initialized');
      }
    }
  }
}, "0.0.1", { requires: [ 'json', 'cache-offline' ] });
There are two ways to cook-up the controller:
- One, create an action, say,
operate, that is implemented using command pattern. - Two, create multiple actions, one for each operation.
The first style is what I have used in my actual code. For the sake of completeness and variety, I use the second option here. So, let us create a function getAll in the controller as well. Additionally, we create another view – items.hb.html – that will be used to
YUI.add('TodoMojit', function(Y, NAME) {
"use strict";
Y.namespace('mojito.controllers')[NAME] = {
index: function(ac) {
ac.assets.addBlob('<meta charset="utf-8">\n<meta http-equiv="X-UA-Compatible" content="IE=edge,chrome=1">', 'top');
ac.assets.addBlob('<link href="/static/' + ac.type + '/assets/base.css" rel="stylesheet" type="text/css" />', 'top');
ac.assets.addBlob('<!--[if IE]>\n<script src="/static/' + ac.type + '/assets/ie.js"></script>\n<![endif]-->', 'top');
ac.done({});
},
getAll: function(ac) {
ac.models.get('Todo').getAll(function(err, items) {
if(err) {
ac.error(err);
} else {
ac.done({
"items": items.reverse()
}, 'items');
}
});
}
}
}, '0.0.1', {requires: ['mojito', 'TodoMojitModelTodo',
'mojito-models-addon', 'json',
'mojito-assets-addon', 'mojito-params-addon']});
And here’s how our view looks like:
{{#items}}
<li id="{{id}}" class="{{#completed}}completed{{/completed}}">
<div class="view">
	<input class="toggle" type="checkbox"{{#completed}} checked="checked"{{/completed}} />
	<label>{{{title}}}</label>
	<button class="destroy"></button>
</div>
<input class="edit" type="text" value="{{{title}}}" />
</li>
{{/items}}
To glue it all, we need the binder. The binder, upon launch, will request to get all the items and update the UI. We create two functions in the binder:
resync: This function will fetch the markup for all the items and trigger UI refresh._resyncUI: This function will actually refresh the UI.
      bind: function(node) {
        var self = this;

        this.node = node;
        this.inputNode = node.one('#new-todo');
        this.listNode = node.one('#todo-list');
        this.toggleAll = node.one('#toggle-all');
        this.main = node.one('#main');

        self.resync();
    },

    resync: function() {
      var self = this;
      self.mp.invoke('getAll', { 'params': { }}, function(err, response) {
        if(!err) {
          self.listNode.set('innerHTML', '');
          if(response) {
            self.listNode.append(response);
          }
          self._resyncUI();
        }
      });
    },

    _resyncUI: function() {
      var n = this.node,
        toggles = n.all('.toggle'),
        size = toggles.size(),
        allSel = true,
        i;

      for(i = 0; i < size; i++) {
        if(!toggles.item(i).get('checked')) {
          allSel = false;
          break;
        }
      }
      this.toggleAll.set('checked', size > 0 ? allSel : false);
      this.main[size > 0 ? 'show': 'hide']();
    }

  };

}, '0.0.1', {requires: ['mojito-client', 'node', 'json', 'escape']});
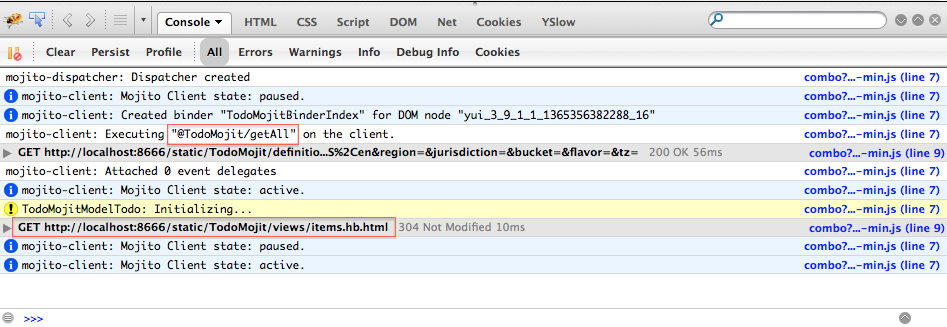
Launch the application. It should, still, show same UI as earlier. There are no TODO items after all. Monitor the console (Firebug or Chrome console) to ensure that there are no errors. Firebug console should show you log similar to as shown next:
In the next post, we implement the add behaviour to our application.
Leave a Reply